
Creating and managing client alerts in Buildify is a straightforward process that helps keep your clients updated with the latest property listings that match their preferences. Follow these steps to set up and share saved searches with your clients.
Step-by-Step Guide
Step 1: Access the Search Filter
1. Log in to your Buildify account.
2. Navigate to the search filter section to customize the property search according to your client's requirements.

Step 2: Customize the Search Filters
1. Selling Status: Select the selling status (e.g., Selling).
2. City: Choose the desired city (e.g., Vaughan).
3. Neighborhood: Select the neighborhood (e.g., Moss Park).
4. Condo Type: Specify the condo type (e.g., Condo, ...).
5. Construction Status: Select the construction status (e.g., Select Construction Status).
6. Move-In Date: Choose the expected move-in date (e.g., 2025).
7. Price: Set the price range (e.g., Select Price).
8. Size: Specify the size (e.g., Select Size).
9. Downpayment Before Occupancy: Select the downpayment percentage (e.g., 15%).
10. Bedrooms: Choose the number of bedrooms (e.g., 2).
11. Bathrooms: Select the number of bathrooms (e.g., 2).
12. Exposure: Check the exposure preferences (North, South, East, West).
13. Others: Select additional preferences (e.g., Parking, Locker).
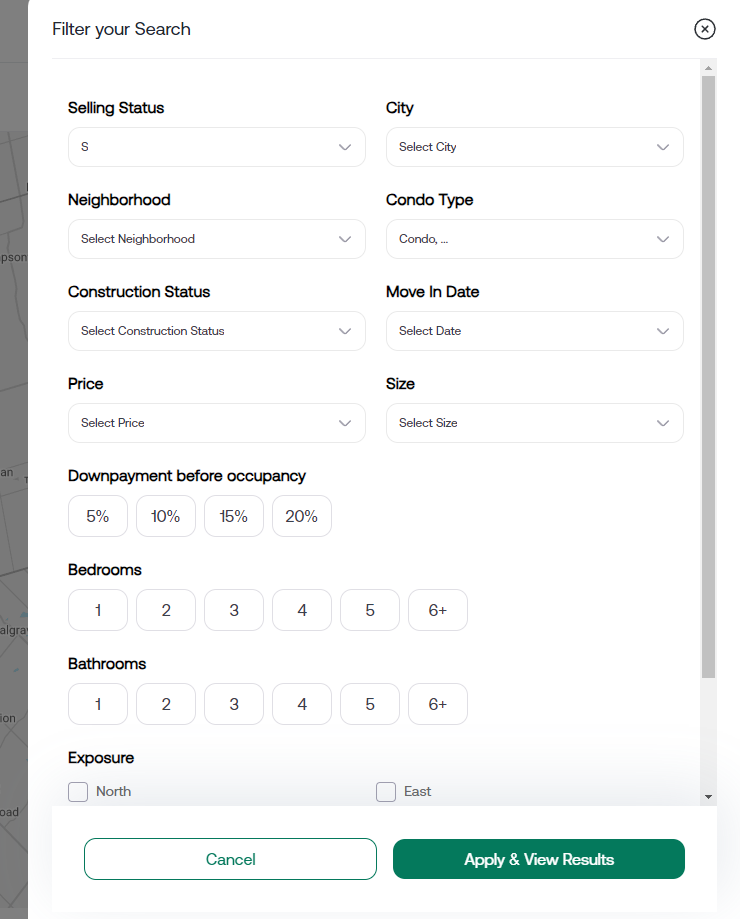 Step 3: Apply and View Results
1. Click on the "Apply & View Results" button to see the filtered property listings.
2. Review the results to ensure they match the client's preferences.
Step 4: Save and Share the Search
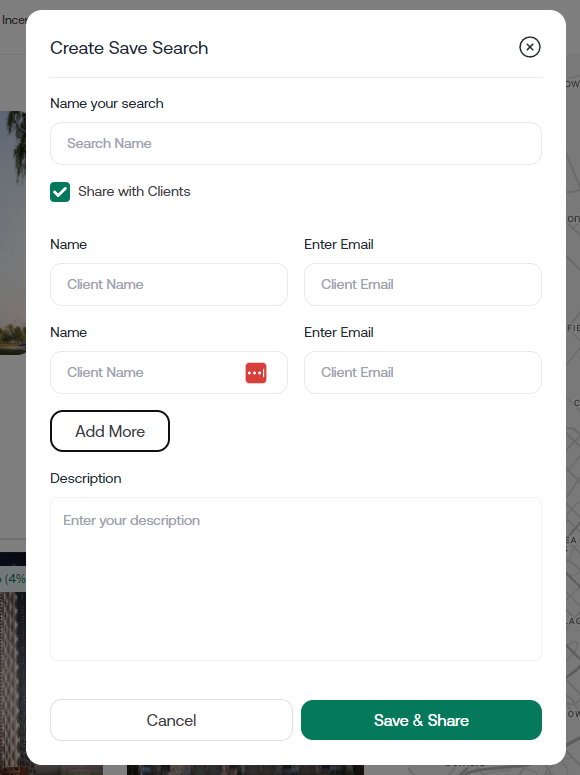
1. Click on the save icon to create a saved search.
2. Fill in the details in the "Create Save Search" dialog:
- Name Your Search: Enter a name for the search (e.g., Client 1).
- Share with Clients: Check the box to share the search with clients.
- Name: Enter the client's name.
- Email: Enter the client's email address. Click "Add More" to add multiple clients.
- Description: Provide a description based on the filtered criteria.
 Step 5: Save & Share
1. Click on the "Save & Share" button to save the search and notify your clients via email.
2. Clients will receive an email with the saved search details and a link to view the property listings.
Step 6: Manage Saved Alerts
1. To manage saved alerts, navigate to the sidebar menu and click on "Saved Alerts."
2. Here, you can view, edit, or delete saved searches.
3. Click on a saved alert to make modifications or to resend the alert to your clients.
Tips for Effective Client Alerts
- Regular Updates: Regularly update the saved searches to ensure clients receive the most current listings.
- Client Preferences: Keep track of client preferences and adjust the filters as needed.
- Feedback: Encourage clients to provide feedback on the listings they receive to better tailor future searches.
By following these steps, you can efficiently create and manage client alerts in Buildify, ensuring your clients stay informed about new property listings that match their needs.
If you have any questions or need further assistance, please contact our support team at support@buildify.com.